sexta-feira, 12 de junho de 2020

How To Protect Your Private Data From Android Apps

protect-private-data-from-apps
In android there is lots of personal data that can be accessed by any unauthorized apps that were installed on the device. This is just because your Android data is openly saved in your file explorer that is not encrypted or protected by encryption method, so, even normal app can also hijack your data very easily as the media access permissions are granted when you click on accept button while installing the apps. And this may be endangering the private data that you might not want to share with anyone. So here we have a cool way that will help you to make your data private by disallowing the apps to access your media files without your permission. So have a look on complete guide discussed below to proceed.

How To Protect Your Private Data From Android Apps

The method is quite simple and just need a rooted android device that will allow the Xposed installer to run on the device. And after having the Xposed installer you will be using an Xposed module to disallow the apps to have access to your personal or say private data. For this follow the guide below.

Steps To Protect Your Private Data From Android Apps:

Step 1. First of all, you need a rooted android as Xposed installer can only be installed on a rooted android, so Root your android to proceed for having superuser access on your android.
Step 2. After rooting your Android device you have to install the Xposed installer on your android and thats quite lengthy process and for that, you can proceed with our Guide to Install Xposed Installer On Android.Xposed Installer
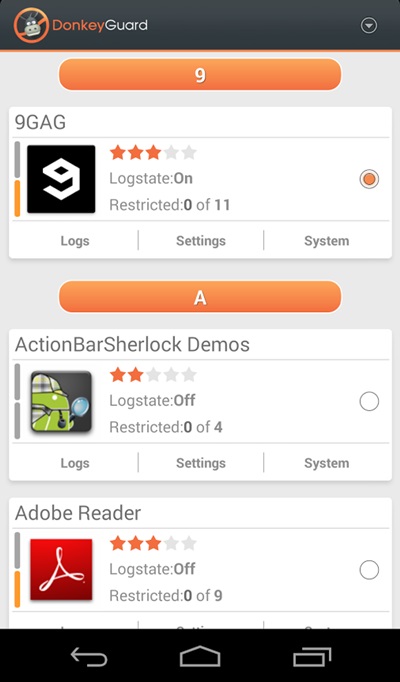
Step 3. Now after having an Xposed framework on your Android the only thing you need is the Xposed module that is DonkeyGuard – Security Management the app that will allow you to manage the media access for apps installed on your device.
Step 4. Now install the app on your device and after that, you need to activate the module in the Xposed installer. Now you need to reboot your device to make the module work perfectly on your device.
Step 5. Now launch the app and you will see all the apps that are currently installed on your device.
privacy 1
Step 6. Now edit the media permission for the apps that you don't want to have access to your media with private data.privacy 2
That's it, you are done! now the app will disallow the media access to that apps.

Manually Checking App Permission

Well, our Android operating system offers a nice feature in which we can manage a single app's permission. However, you need to have Android 6.0 Marshmallow or a newer version to get the option.
Step 1. First of all, open Settings and then tap on 'Apps'.
Manually Checking App Permission
Step 2. Now you will see the list of apps that are currently installed on your Android smartphone. Now you need to select the app, and then you will see 'Permissions.'
Manually Checking App Permission
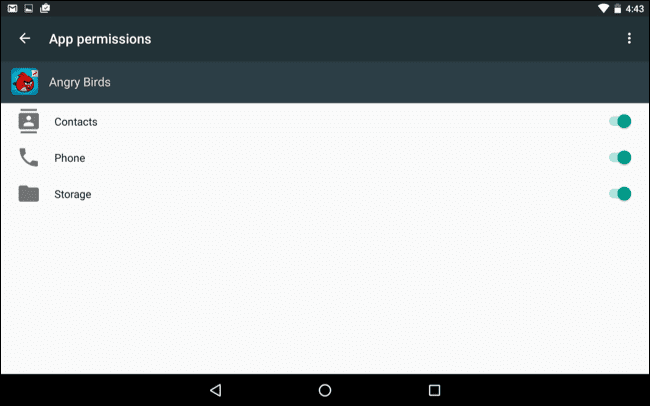
Step 3. Now it will open a new window, which will show you all permissions that you have granted to the app like Camera access, contacts, Location, microphone, etc. You can revoke any permissions as per your wish.
Manually Checking App Permission
Well, the same thing you need to perform if you feel that you have installed some suspicious app on your Android. By this way, you can protect your private data from Android apps.
More articles

  1. How To Pentest A Website
  2. Pentest Tools
  3. Pentest Active Directory
  4. Pentest Cheat Sheet
  5. Pentest Aws
  6. Pentest Practice Sites
  7. Hacking Simulator
  8. Pentest Dns Server
  9. Hacking Linux
  10. Hacker Computer
  11. Pentest Process
  12. Pentester Academy
  13. Hackerx
  14. Pentesting
  15. Hacking Programs
  16. Hacker Code
  17. Hacker Prank
  18. Basic Pentest 1 Walkthrough

quinta-feira, 11 de junho de 2020

Cain And Abel

"Cain & Abel is a password recovery tool for Microsoft Operating Systems. It allows easy recovery of various kind of passwords by sniffing the network, cracking encrypted passwords using Dictionary, Brute-Force and Cryptanalysis attacks, recording VoIP conversations, decoding scrambled passwords, recovering wireless network keys, revealing password boxes, uncovering cached passwords and analyzing routing protocols. The program does not exploit any software vulnerabilities or bugs that could not be fixed with little effort. It covers some security aspects/weakness present in protocol's standards, authentication methods and caching mechanisms; its main purpose is the simplified recovery of passwords and credentials from various sources, however it also ships some "non standard" utilities for Microsoft Windows users." read more...

Website: http://www.oxid.it/cain.html

More info


TorghostNG: Make All Your Internet Traffic Anonymized With Tor Network

About TorghostNG
   TorghostNG is a tool that make all your internet traffic anonymized with Tor network. TorghostNG is rewritten from TorGhost with Python 3.

   TorghostNG was tested on:
  • Kali Linux 2020a
  • Manjaro
  • ...

What's new in TorghostNG 1.2

Before you use TorghostNG
  • For the goodness of Tor network, BitTorrent traffic will be blocked by iptables. Although you can bypass it with some tweaks with your torrent client 😥 It's difficult to completely block all torrent traffic.
  • For security reason, TorghostNG is gonna disable IPv6 to prevent IPv6 leaks (it happened to me lmao).

Screenshots of Torghost (Version 1.0)
   Connecting to Tor exitnode in a specific country: torghostng -id COUNTRY ID

   Changing MAC address: torghostng -m INTERFACE

   Checking IP address: torghostng -c

   Disconnecting from Tor: torghostng -x

   Uninstalling TorghostNG: python3 install.py

Installing TorghostNG
   TorghostNG installer currently supports:
  • GNU/Linux distros that based on Arch Linux
  • GNU/Linux distros that based on Debian/Ubuntu
  • GNU/Linux distros that based on Fedora, CentOS, RHEL, openSUSE
  • Solus OS
  • Void Linux
  • Anh the elder guy: Slackware
  • (Too much package managers for one day :v)

   To install TorghostNG, open your Terminal and enter these commands:
   But with Slackware, you use sudo python3 torghostng.py to run TorghostNG :v

Help
    You can combine multiple choices at the same time, such as:
  • torghostng -s -m INTERFACE: Changing MAC address before connecting
  • torghostng -c -m INTERFACE: Checking IP address and changing MAC address
  • torghostng -s -x: Connecting to Tor anh then stop :v
  • ...
   If you have any questions, you can watch this tutorial videos 🙂
   I hope you will love it 😃

How to update TorghostNG
   Open Terminal and type sudo torghostng -u with sudo to update TorghostNG, but it will download new TorghostNG to /root, because you're running it as root. If you don't like that, you can type git pull -f and sudo python3 install.py.

Notes before you use Tor
   Tor can't help you completely anonymous, just almost:
   It's recommended that you should use NoScript before before surfing the web with Tor. NoScript shall block JavaScript/Java/Flash scripts on websites to make sure they won't reveal your real identify.

And please
  • Don't spam or perform DoS attacks with Tor. It's not effective, you will only make Tor get hated and waste Tor's money.
  • Don't torrent over Tor. If you want to keep anonymous while torrenting, use a no-logs VPN please.
   Bittorrent over Tor isn't a good idea
   Not anonymous: attack reveals BitTorrent users on Tor network

Changes log
   Version 1.2
  • Fixed update_commands and others in torghostng.py
  • Changed a few things in theme.py
  • Changed a few things in install.py
  • Now you can change Tor circuit with -r
   Version 1.1
  • Check your IPv6
  • Change all "TOR" to "Tor"
  • Block BitTorrent traffic
  • Auto disable IPv6 before connecting to Tor

Contact to the coder

To-do lists:
  • Block torrent, for you - Tor network (Done 😃)
  • Connect to IPv6 relays (maybe?)
  • GUI version
  • Fix bug, improve TorghostNG (always)

And finally: You can help me by telling me if you find any bugs or issues. Thank you for using my tool 😊

Related articles


quarta-feira, 10 de junho de 2020

What Is Cybercrime? What Are The Types Of Cybercrime? What Is Cyberlaw In India?

What is cyber crime?

Cybercrime is the use of computers & networks to perform illegal activities such as spreading viruses,online  bullying,performing unauthorized electronic fund transfers etc. Most cyber crimes are committed through the internet.
Some cyber crime also be carried out using mobile phones via Sms and online chatting applications.

TYPES OF CYBERCRIME

The following list presents the common types of cybercrimes-

1-Computer Fraud-Intential deception for personal gain via the use of computer system.

2-Privacy Violations-Exposing personal information such as email addresses,phone numbers,account details etc, on social media,websites,etc.

3-Identity theft-Stealing personal information from somebody and impersonating that person.

4-Sharing copyright files/information-This involves distributing copyright protected files such as eBooks and computer program etc.

5-Electronic funds transfer-This involves gaining an unauthorized access to bank computer networks and making illegal funds transferring.

6-Electronic money laundering-This involves the use of the computer to launder money.

7-Atm fraud-This involves intercepting ATM card details such as account numbers and PIN numbers.These details are then used to withdraw funds from the intercepted accounts.

8-Denial of service attack-This involves the use of computers in multiple locations to attack servers with a view of shutting them down.

9-Spam:sending unauthorized emails.
These emails usually contain advertisements.


CYBER LAW

Under The Information Technology Act,2000 
CHAPTER XI-OFFENCES-66. Hacking with computer system.

1-whoever with the Intent to cause or knowing that he is likely to cause Wrongfull Loss or Damage to the public or any person Destroys or Deletes or Alter any Information Residing in computer Resource or diminishes its value or utility or affects it injuriously by any means, commits hack.

2-whoever commits hacking shell be punished with imprisonment up to three years, or  with fine which may extend up to two lakh rupees,or with both.
Related news

  1. Pentest Checklist
  2. Hacking Games Online
  3. Hacking The System
  4. Hacker Keyboard
  5. Hacking Jailbreak
  6. Pentester Academy
  7. Pentest Iso

Medusa: A Speedy, Parallel And Modular Login Brute-forcing Tool


About Medusa
   Medusa is a speedy, parallel, and modular, login brute-forcer. The goal is to support as many services which allow remote authentication as possible. The author considers following items as some of the key features of this application:

   Thread-based parallel testing. Brute-force testing can be performed against multiple hosts, users or passwords concurrently.

   Flexible user input. Target information (host/user/password) can be specified in a variety of ways. For example, each item can be either a single entry or a file containing multiple entries. Additionally, a combination file format allows the user to refine their target listing.

   Modular design. Each service module exists as an independent .mod file. This means that no modifications are necessary to the core application in order to extend the supported list of services for brute-forcing.

   Multiple protocols supported. Many services are currently supported (e.g. SMB, HTTP, MS-SQL, POP3, RDP, SSHv2, among others).

   See doc/medusa.html for Medusa documentation. For additional information:

Building on macOS

#getting the source
git clone https://github.com/jmk-foofus/medusa
cd medusa

#macOS dependencies
brew install freerdp
$ export FREERDP2_CFLAGS='-I/usr/local/include'
$ export FREERDP2_LIBS='-I/usr/local/lib/freerdp'

#building
./configure
make

#executing

./src/medusa
Medusa's Installation
   Medusa is already installed on Kali Linux, Parrot Security OS, BlackArch and any other Linux distros based for security pentesting purposes.

   For Debian-based distro users, open your Terminal and enter this command:
sudo apt install medusa

   For Arch Linux-based distro users, enter this command: sudo pacman -S medusa

About the author:

You might like these similar tools:
Related word

  1. Hacking 3Ds
  2. Hacking
  3. Pentest Ios
  4. Pentest Bootcamp
  5. Pentest Tools
  6. How To Pentest A Network
  7. Pentest Certification
  8. How To Pentest A Website
  9. Hacking Resources
  10. Pentest Cheat Sheet
  11. Hacking Meaning
  12. Pentest Example Report
  13. Pentest Windows 7
  14. Pentest Website

Hacking PayPal's Express Checkout


Do you know what is happening in the background when you buy something in an online shop using PayPal?

In this post we will tackle the following problems:
  • How can PayPal's API be tested?
  • How does PayPal's Express Checkout work? You can find the detailed report here.
  • How can we debit more money than authorized?

How PayPal's API can be tested?

PayPal's Sandbox API

PayPal offers a feature called PayPal Sandbox Accounts, which mimics the production API. The basic idea is that a normal user/shop can test the API and make transactions without actually transferring money. This is the perfect tool for developers to test their API integration.

Access to all messages

The next question is how to get access to all messages. All browser-related messages can be inspected, intercepted, and modified via BurpSuite. The main problem here is how to get access to the server-to-server exchanged messages: the messages exchanged between PayPal and a shop. In order to solve this problem, we deployed our own shop. For this purpose we used Magento, which already has a PayPal integration.
Once we have our own controlled shop, we can enforce Magento to send all request through a proxy.
In the following picture you can see our setup.
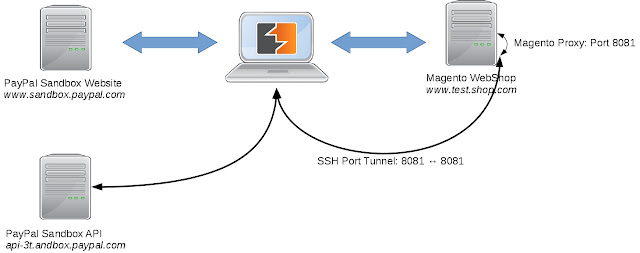
Test suite for analyzing PayPal's API [1]

In order to capture the traffic between our Magento hhop and PayPal we proceeded as follows:
  • We configured Magento to use a proxy running on localhost:8081.
  • We connected the proxy port on the virtual machine with our local machine via SSH remote port forwarding by issuing the following command
    ssh -N -R 8081: localhost :8081 <IP of Magento shop>
  • We configured BurpSuite running on our local machine to listen on Port 8081 for incoming requests.
Now, we were able to see the entire traffic.
Please note that we uses our own, custom Magento shop in order to be able to test Paypal's API.

PayPal's Express Checkout

An overview of the checkout procedure is depicted in the following:
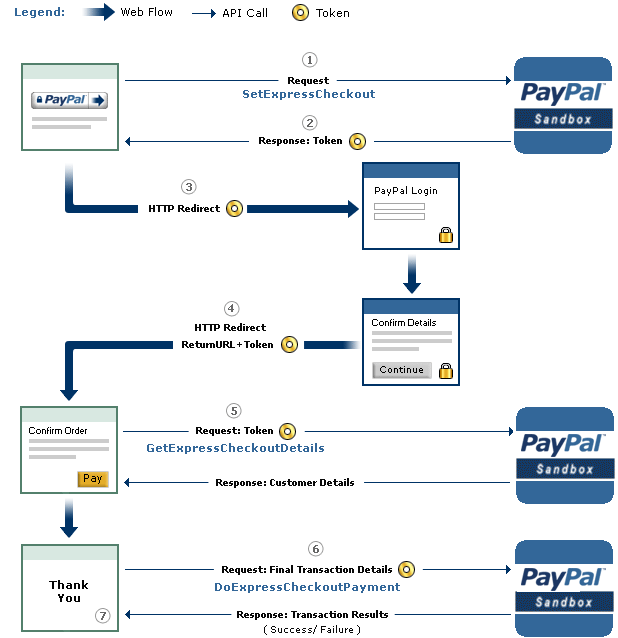
PayPal's Express Checkout [2]


Step 1: Magento tells the PayPal API where to redirect the user after authorizing the transaction via the parameter RETURNURL and requests a token for this transaction.
Step 2: The PayPal API provides Magento with the token.
Step 3: Magento redirects the user to PayPal's website. The redirect contains the token from the previous step.
Step 4:  The user authorizes the transaction. As a result, he will be redirected back to Magento (RETURNURL) with the token.
Step 5: Magento issues a request to the PayPal API to get the transaction details.

Step 6: Magento signals the PayPal API to execute the transaction.

Step 7: Magento serves the success page.

A more detailed view of the protocol and all parameters is shown on page 16 in the full version. We will concentrate only on step 6 and the parameters relevant for the attack.

The Attack

The goal of the attack is to let a shop (in our case Magento) debit more money than authorized by the PayPal user. The core of the attack is Step 6 -- DoExpressCheckoutPayment. Let's get a deeper look at this message:

Magento can raise the authorized amount and debit more money from the user's account

  • The shop sends the token, which was issued in the first step of the protocol and identifies uniquely the transaction through all steps. 
  • The PayerID referring to the user that authorized the payment.
  • The AMT defining the amount, which will be transferred.
  • The API Credentials authenticating Magento on PayPal.
  • The Version pointing to the release number of the API.

As one can imagine, the core problem we found was the change of the AMT parameter. This value can be freely chosen by the shop, despite the fact that the user has authorized a different amount.

We tested only the SandBox API, but refused to test the production API in order to avoid problems. We promptly contacted PayPal's security team and described the problem hoping that PayPal can and will test the production API against the attack.

The response of PayPal can be summarized as follows:
  • We don't get any BugBounty since we only tested the Sanbox API. (Fair enough)
  • In the Production API PayPal this flexibility is a wanted feature. Thus, PayPal allows a merchant to charge for shipping and/or other expenses different amounts. Any malicious behavior can be detected by PayPal. In case of fraudulent charges the consumer are protected by the Buyer Protection policy.
... but the Sandbox API was nevertheless fixed.

Authors of this Post

Daniel Hirschberger
Vladislav Mladenov
Christian Mainka (@CheariX)


[1] BurpSuite Logo
[2] PayPal Express Checkout

Continue reading


  1. Pentest Tools Framework
  2. Pentestmonkey Sql Injection
  3. Pentest Tools Framework
  4. Basic Pentest 1 Walkthrough
  5. Hacker Kevin Mitnick
  6. Pentest Vs Ethical Hacking
  7. Pentest Usb
  8. Pentestmonkey Cheat Sheet
  9. Pentest Kit
  10. Hacker Language
  11. Pentest Certification
  12. Pentest Vs Red Team
  13. Hacker Box
  14. Pentest Aws
  15. Hacking Ethics
  16. Hacking Process

Cómo Recuperar Conversaciones Y Datos Borrados De WhatsApp

¿Quieres recuperar conversaciones, archivos, fotos, vídeos y demás, borrados de WhatsApp? en el artículo de hoy, queremos explicar paso a paso y con ayuda de un excelente software, como recuperar toda la información que por error haya eliminado de su App de WhatsApp aunque no tengas activada la copia de seguridad.
Este programa lo hemos probado en 3 teléfonos diferentes y hasta el momento ha tenido buena acogida, pero es importante aclarar que no todos tienen la misma suerte y terminen por recuperar cero archivos. Pero la idea es que hagan bien los pasos explicados por la misma fuente creadora del software para evitar no cumplir sus expectativas y poder recuperar todo lo que deseas en pocos segundos.
https://www.dominatupc.com.co/
Todo este procedimiento lo vamos hacer en pocos pasos muy sencillos, ya que la interfaz del programa es realmente simple y sin pérdida alguna. Para ello solo basta por elegir la opción según lo que hayamos perdido y necesitemos recuperar con prioridad, entre ellas poder librar fotos y datos o simplemente recuperar todo.

Procedimiento en solo 4 pasos

  1. Descargar software dando clic aquí "Android - iOS" ( Instalar)
  2. Conecta tu dispositivo al ordenador
  3. Activa la depuración de USB en tu teléfono Android
  4. En la interfaz del programa elige los tipos de archivos que desea analizar
  5. Haz clic en "Recuperar" y luego guardar los archivos perdidos en tu PC
Y ya lo tienes, simple verdad? Funciona perfectamente, es realmente una aplicación apropiada para cualquier persona que quiera recuperar su información borrada de tu dispositivo y lo mejor de todo es que no es necesario se usuario Root para poder cumplir el objetivo.

Tenorshare, además cuenta con varias funciones que puedes ir descubriendo cuando estés en la página oficial. Son muchas las herramientas y posibilidades que nos brinda para un mejor desempeño a nuestro sistema operativo móvil, tales como, desbloqueo de contraseñas, gestión de archivos, reparación de sistema y recuperación de datos. Cada una de esta selección cuenta con alternativas muy útiles que podemos dejar pendiente para cuando las necesitemos.

https://www.dominatupc.com.co/
Funciona con normalidad para dispositivos Android e iOS y con las nuevas tecnologías de recuperación de datos aplicadas, este software es capaz de restablecer tus datos en muy poco tiempo, ya sea mensajes, fotos, vídeos, etc...
Si te sirve el procedimiento es importante que nos cuente si pudo recuperar lo deseado, estaremos atentos a cualquier duda para poder resolver en caso de tener solución a lo que se requiera. No olvides compartir y seguirnos en las diferentes redes sociales. También te puede interesar:(Cómo recuperar datos de manera segura)


Continue reading

Networking | Switching And Routing | Tutorial 3 | 2018


Welcome to my 3rd new tutorial of networking (Routing and Switching). In this blog you will able to watch an interesting video about basic device navigation such as changing device (router or switch) name, configuration of login password, configuring a device information, router IP addresses and many more.

What is router?

Router is a network layer device which is the 3rd layer in the OSI model which is used to communicate different networks. It is an intelligent device fixed at the boundary of network that connects to other networks and responsible for end to end delivery of the packet that requires an IP address which is known as the logical address which is the basic identity of the device just like our identity card number or roll number and so on, for the identification of source and destination devices. Router is the gateway of the network having two interfaces such as inbound and the outbound interface through which the traffic comes in from different networks and comes out traffic to the different networks.

What is an IP address?

Internet protocol (IP) address is a numeric label given to each and every device in the network for the identification of the device just like our roll numbers in collages, universities which identity each and every student uniquely everywhere. So same concept here, it is a logical address which is used whenever the device want to communicate outside the network that means to another network.

What is Switch?

Switch is basically layer 2 device, which is used to connect two or more than two devices with each other in the same network. It is an intelligent device which doesn't allow the broadcast. It requires Media access control (MAC) address to communicate within the network. Now let's move to the video for further.